Launch offer — valid today only

📄 Digital book in PDF · read it on your phone or print it

Machine Troubleshooting, Drawn for Maintenance Techs From Symptom to Root Cause in 5 Steps

Lockout/tagout, the 5-step method, noise and vibration, voltage unbalance, failed bearings, pump cavitation, hydraulic schematics and ladder diagrams. Every topic gets its own page: the drawing first, then what you need to remember. 70 illustrated pages.

START TROUBLESHOOTING THIS WAY

🔒 Secure checkout · PDF by email · 30-day guarantee

Every topic, its own pageEach check drawn, with the explanation right beside it
70 illustrated pages9 parts, from lockout/tagout to the whole method on one card
Up-to-date sourcesOSHA lockout/tagout rule, NFPA 70E and NEMA MG 1
PDF by emailFormat

Look Inside the Book

Every page has one big drawing and a box with the numbers and checks you need to know:

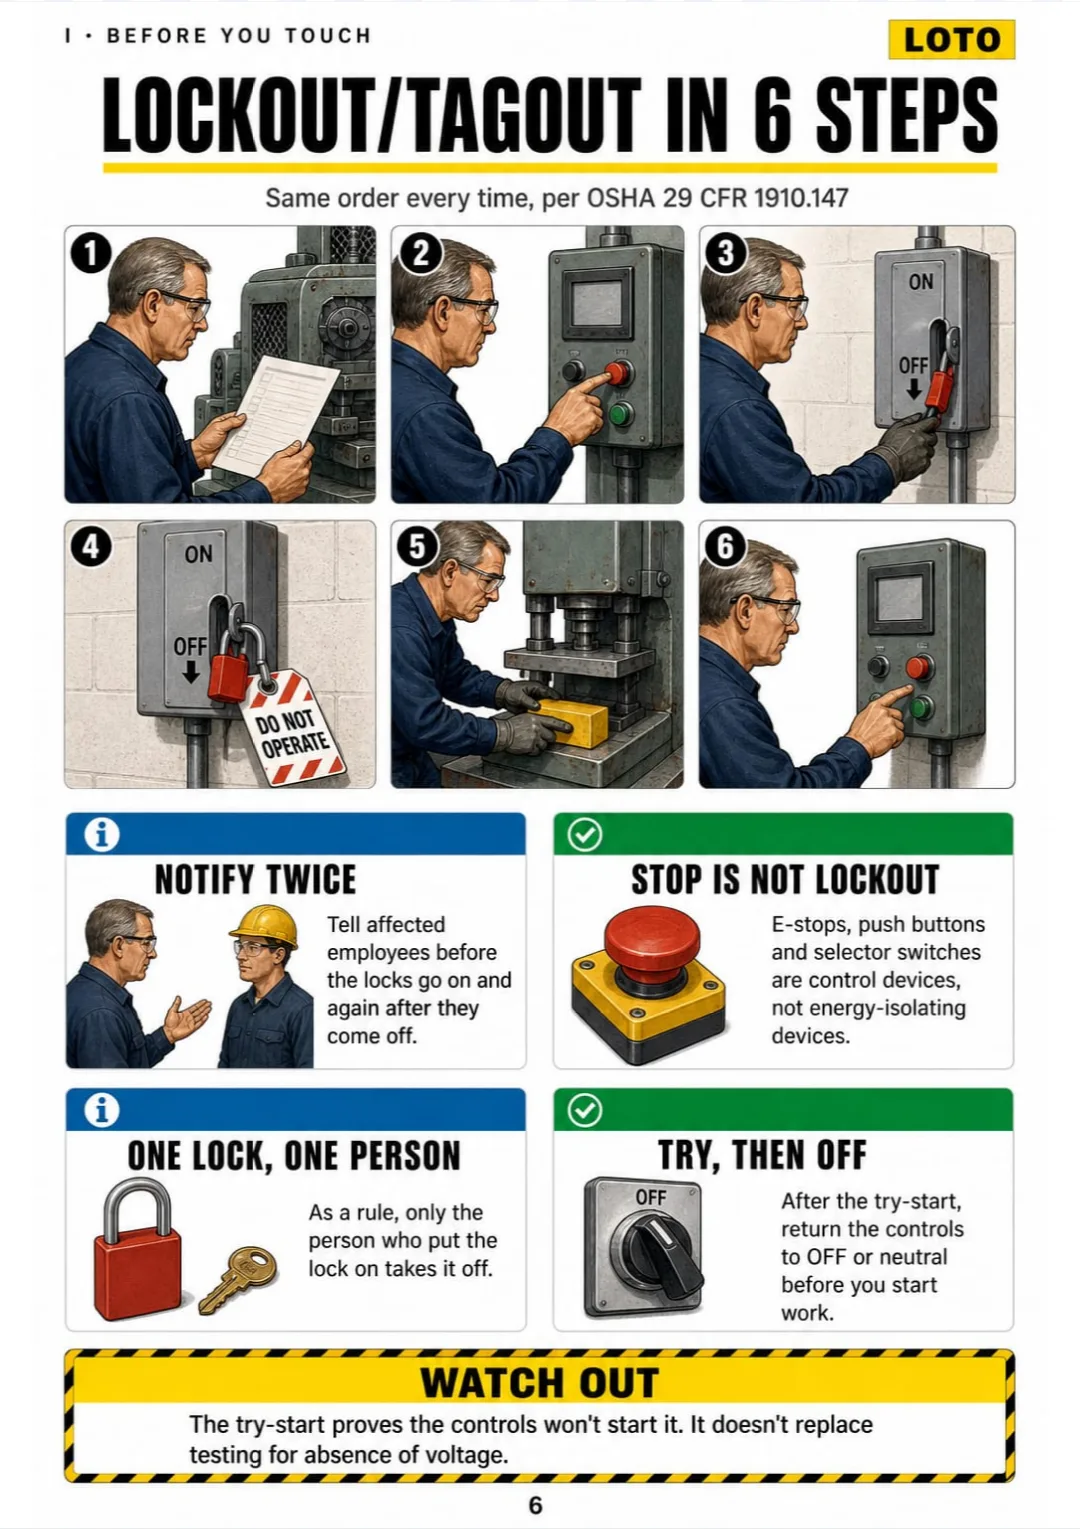
Prepare, shut down, isolate, lock and tag, release stored energy, verify: the 6 OSHA steps in order.
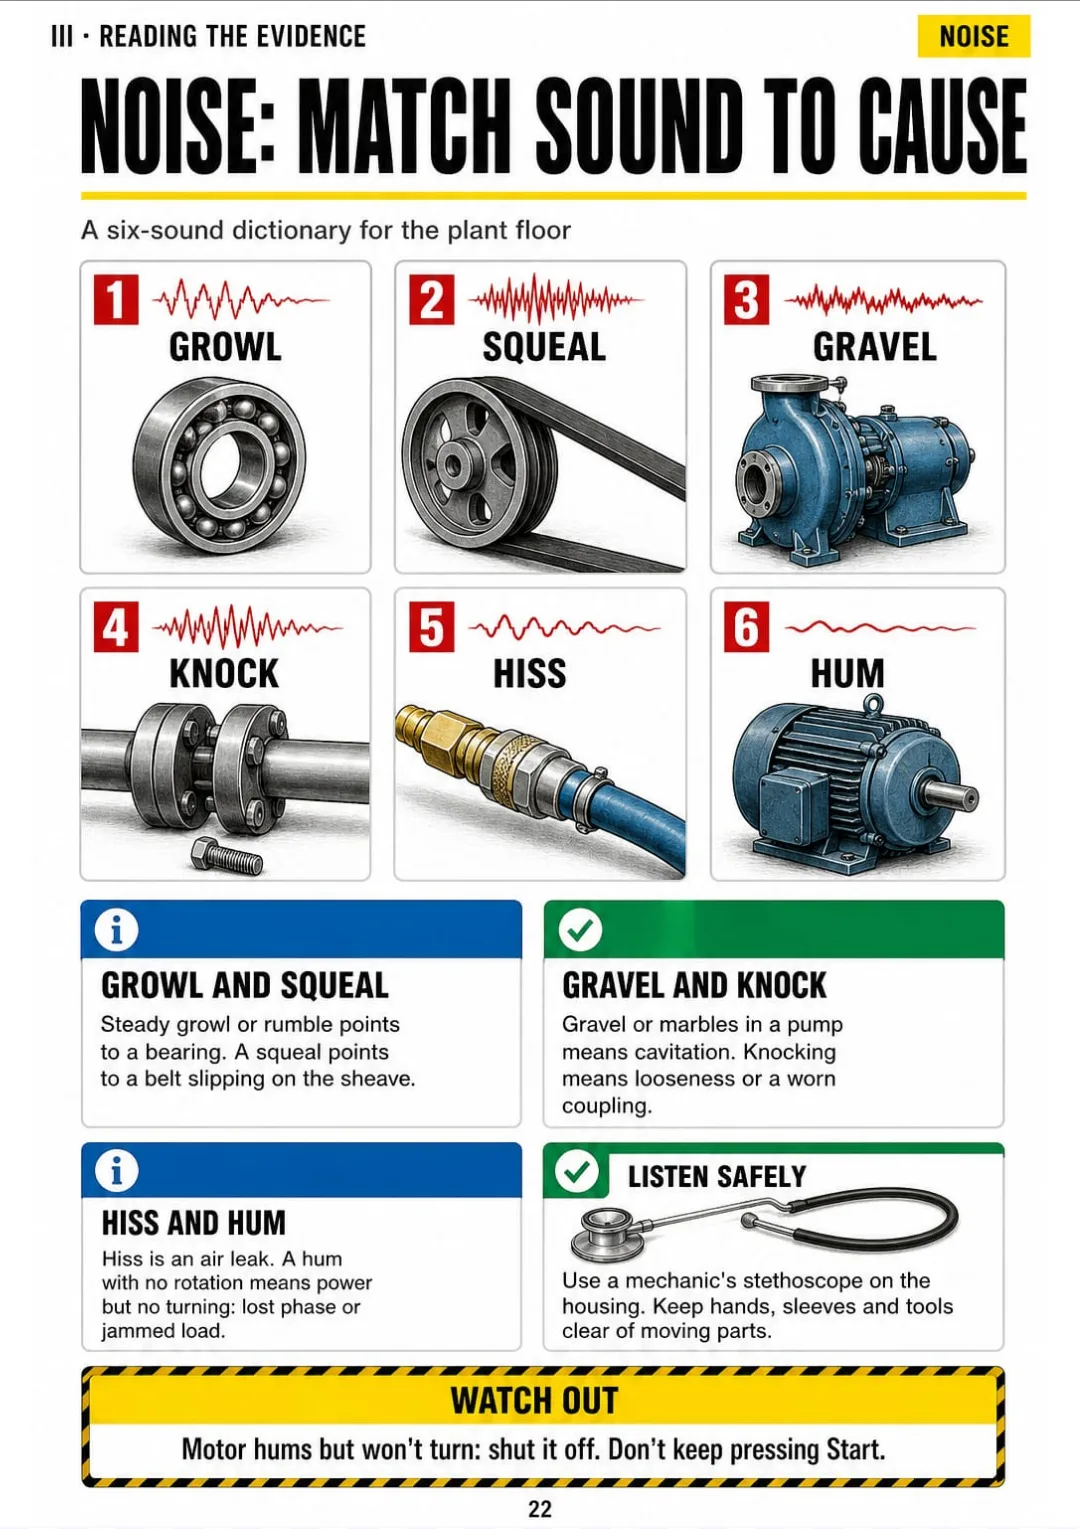
Growl = bearing, squeal = belt, gravel = cavitation, knock = looseness, hiss = air, hum = powered but stuck.
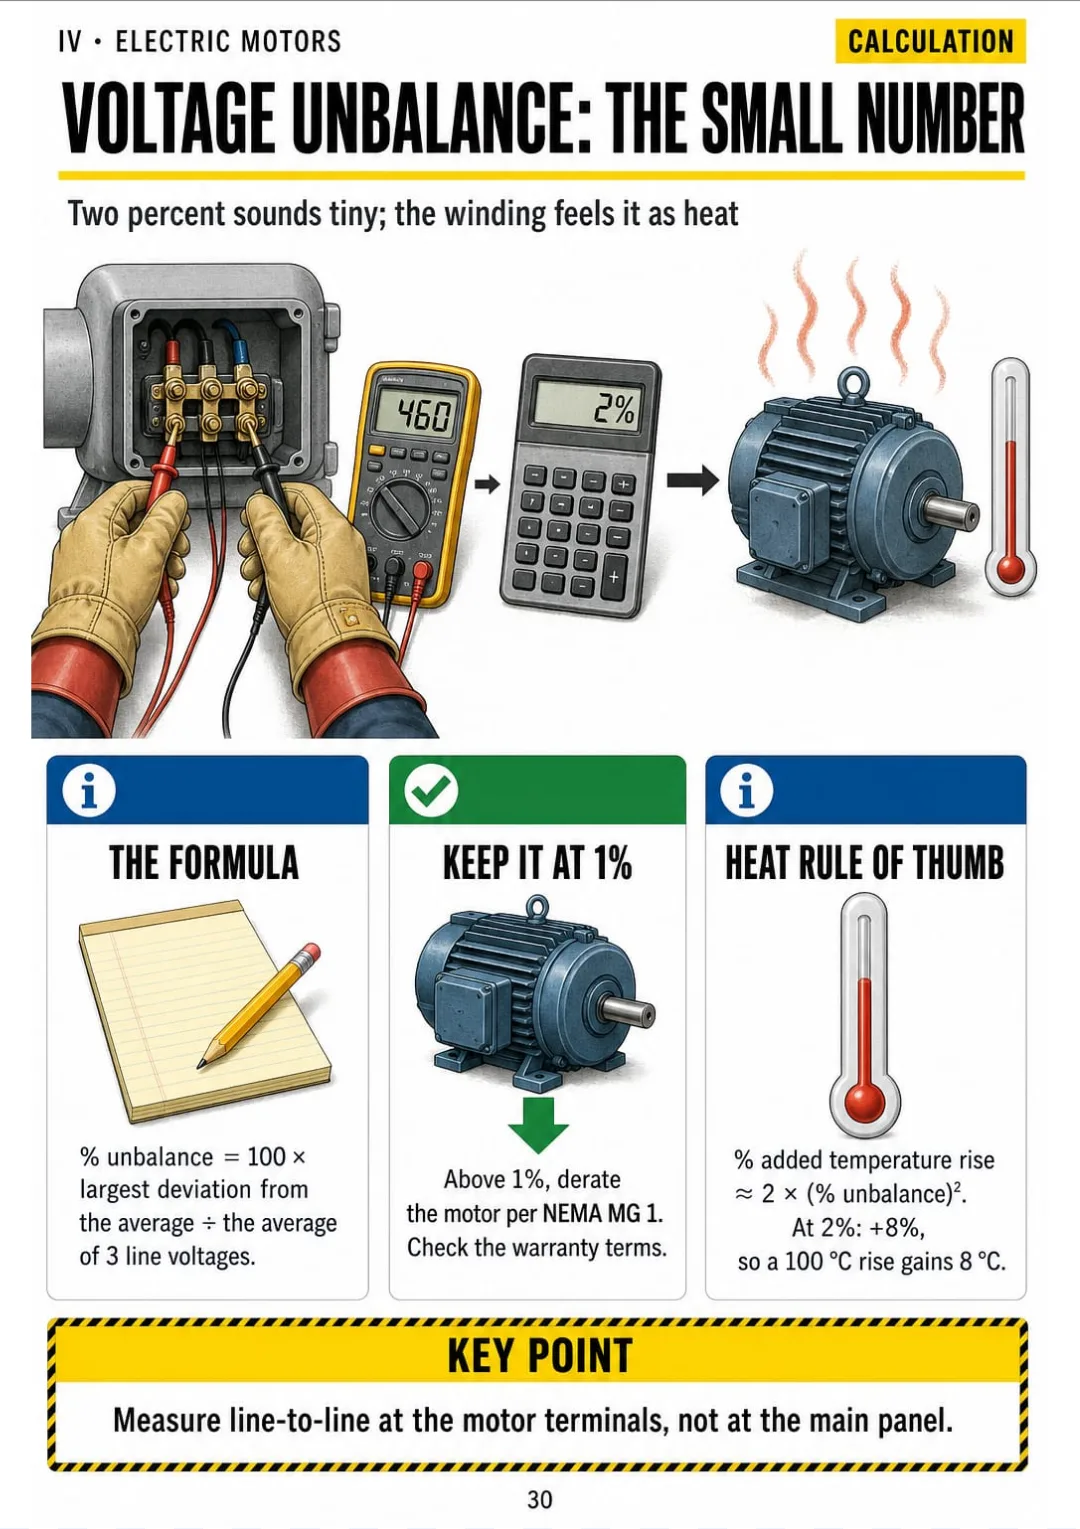
460, 467, 450 V → about 2% unbalance → keep it at 1% or less
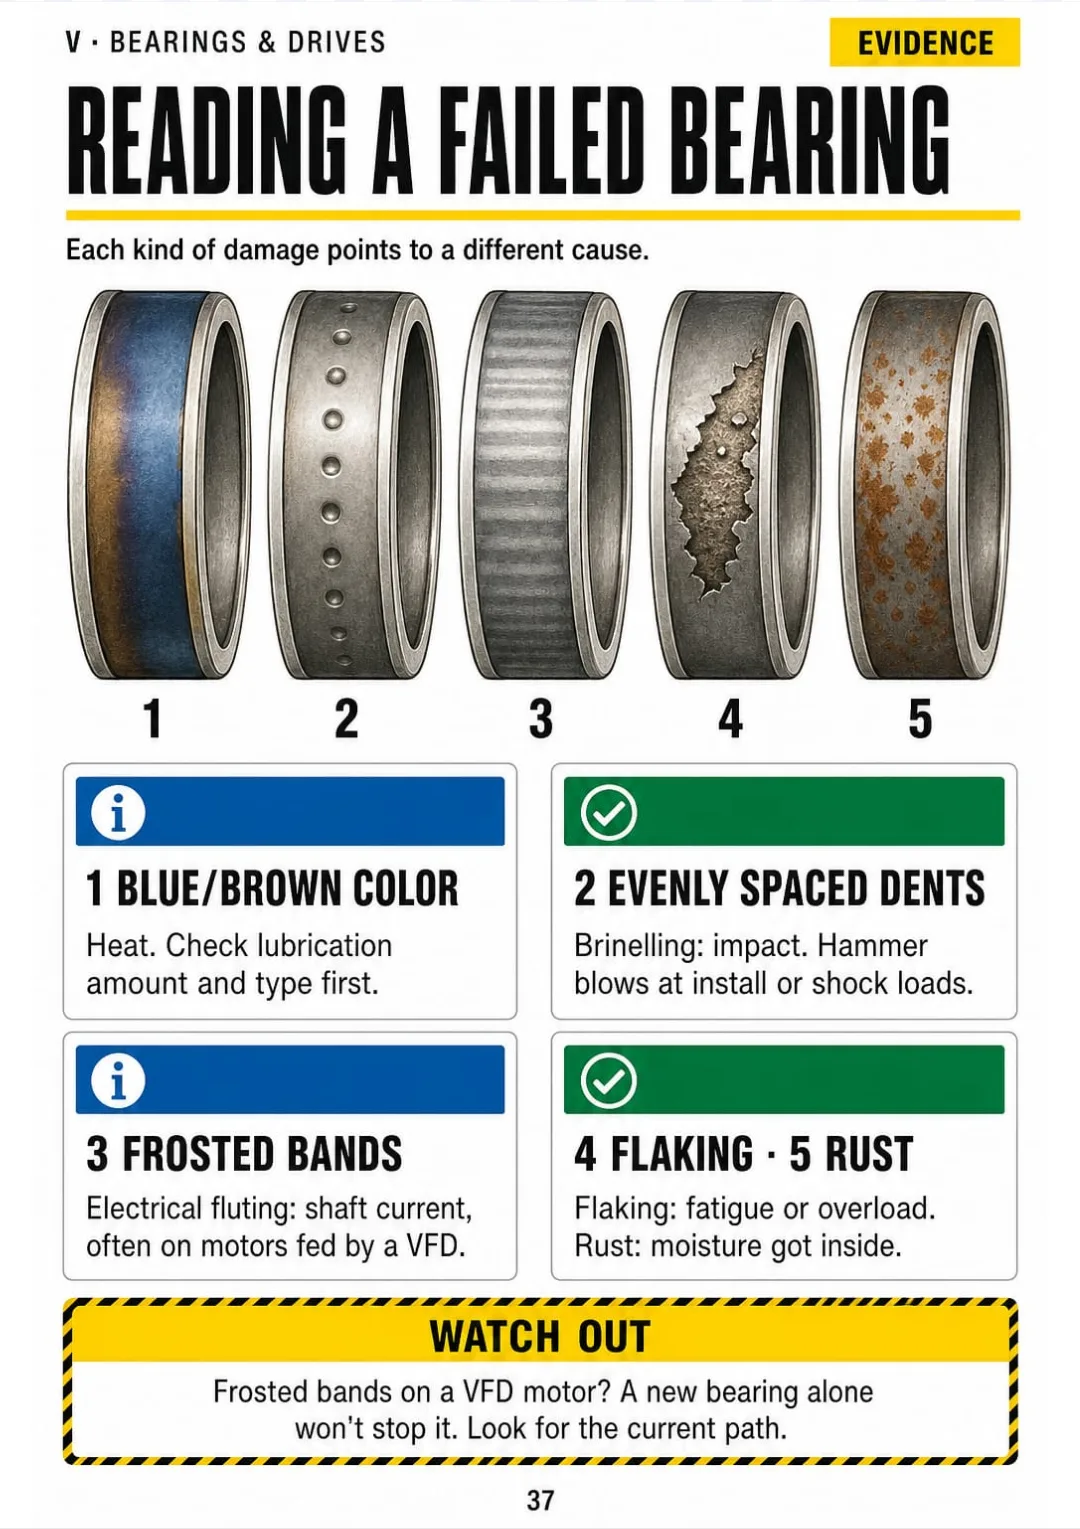
Discoloration, dents, frosted bands, flaking, rust: what each one says.
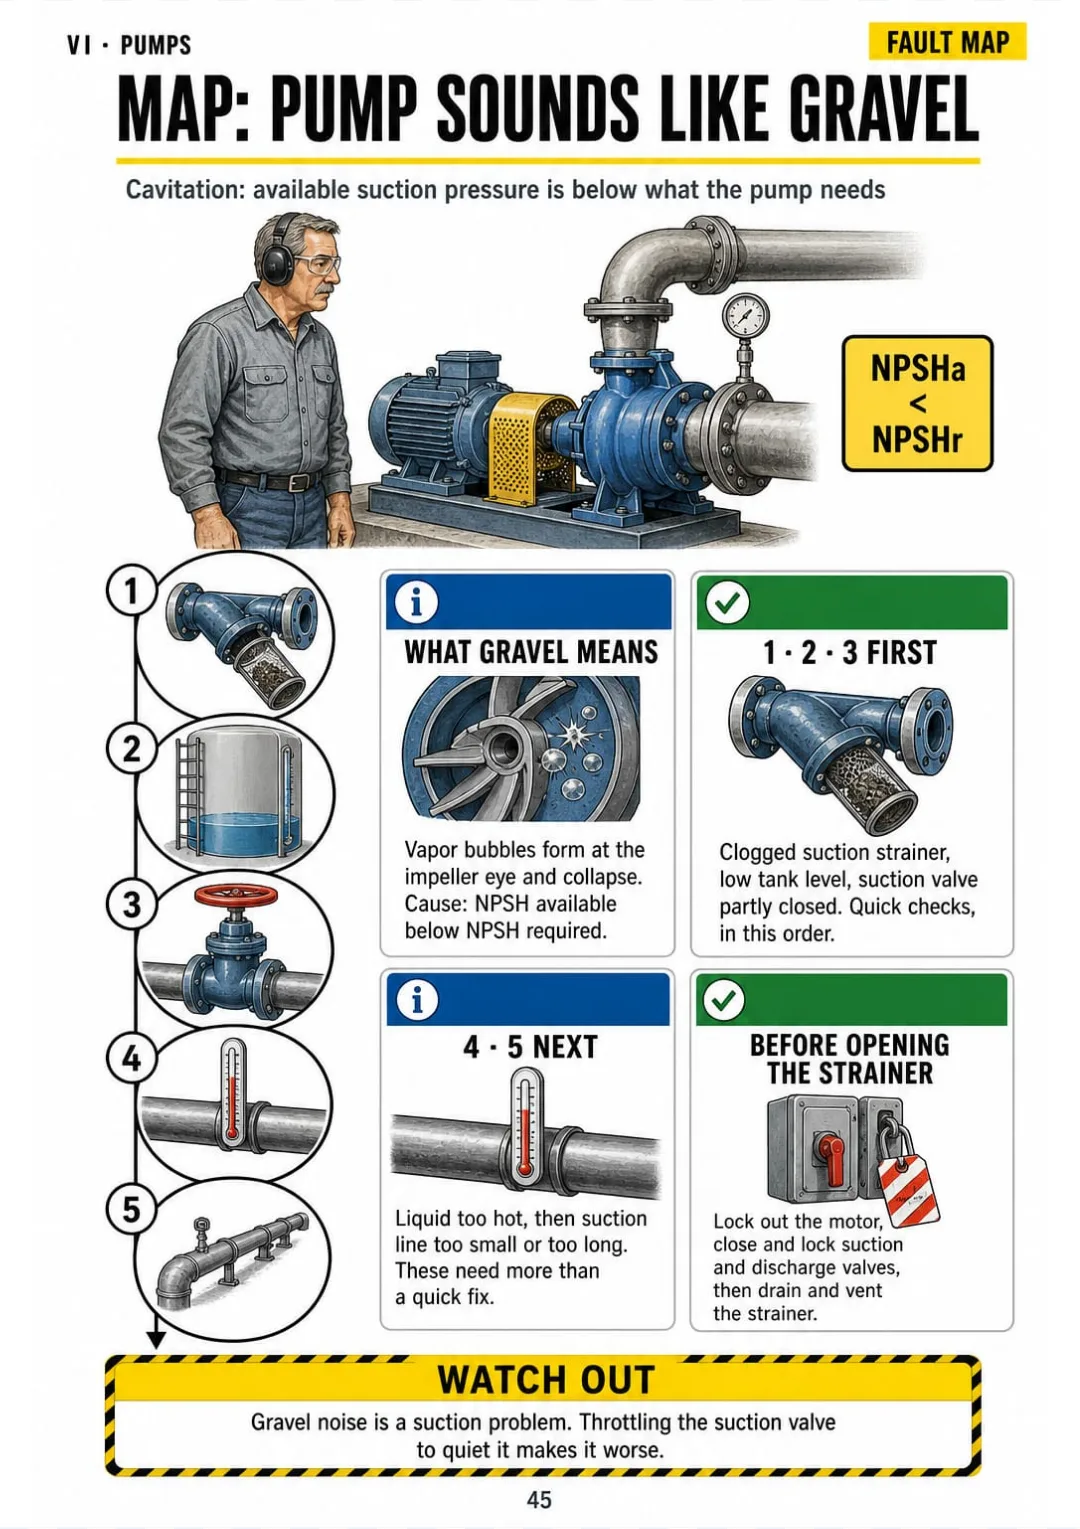
Cavitation map: strainer → tank level → suction valve → liquid temperature → suction line.
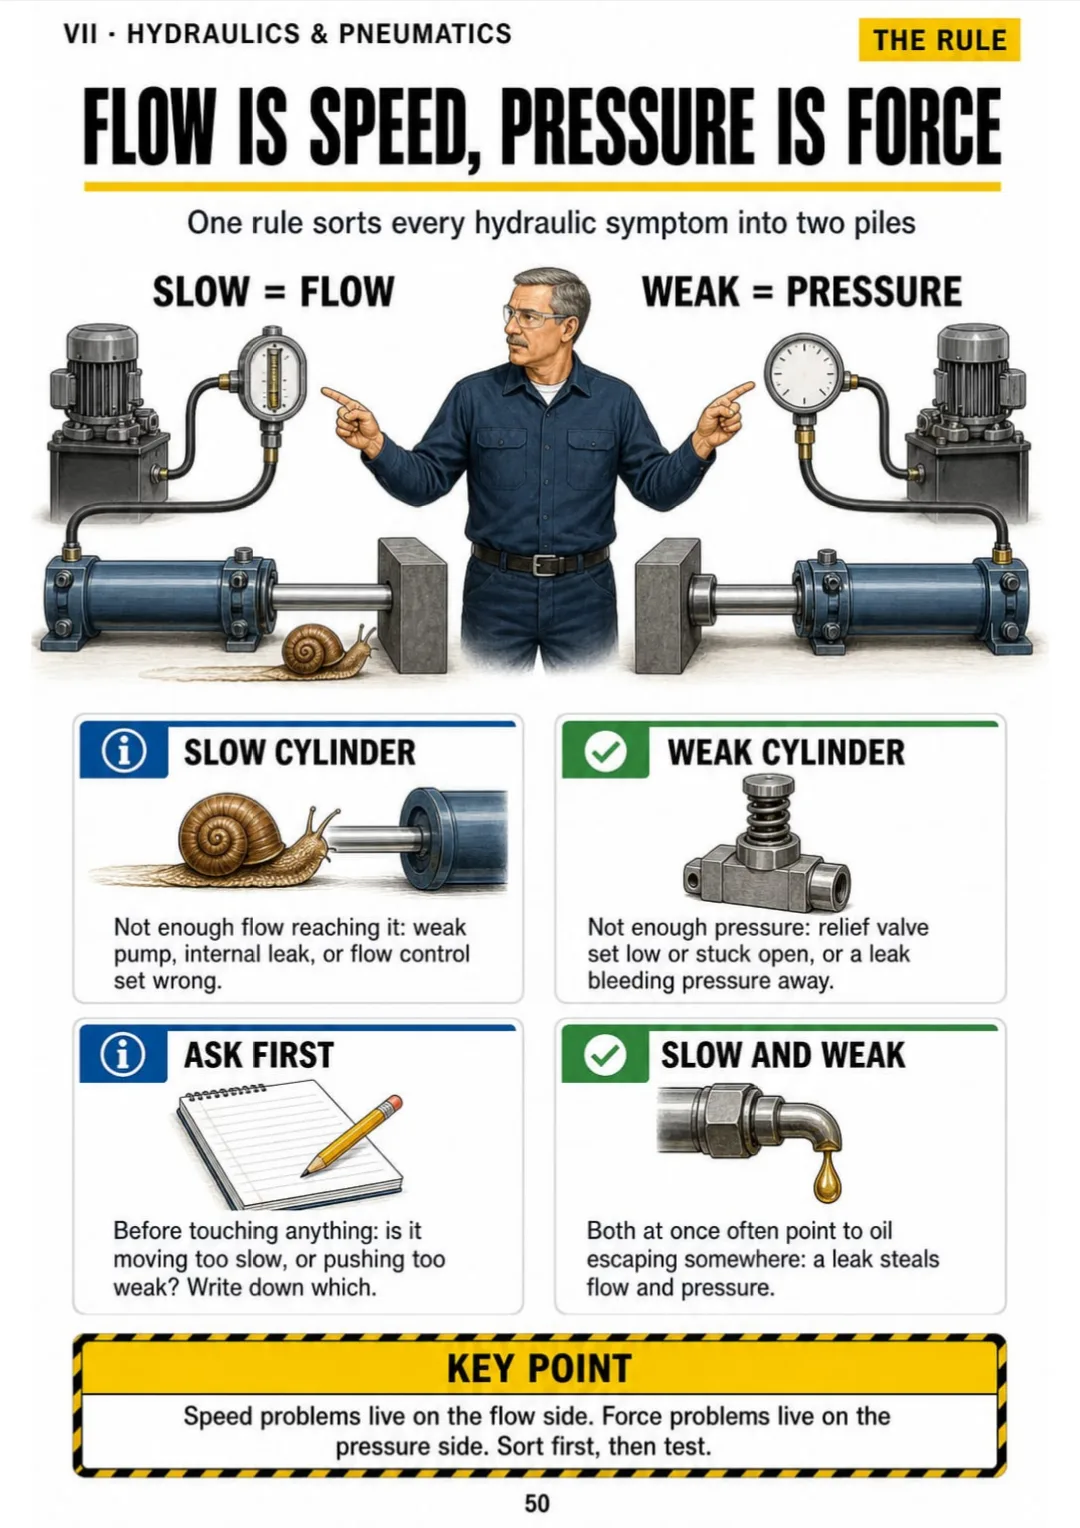
Slow = flow problem. Weak = pressure problem. One cylinder, two gauges.
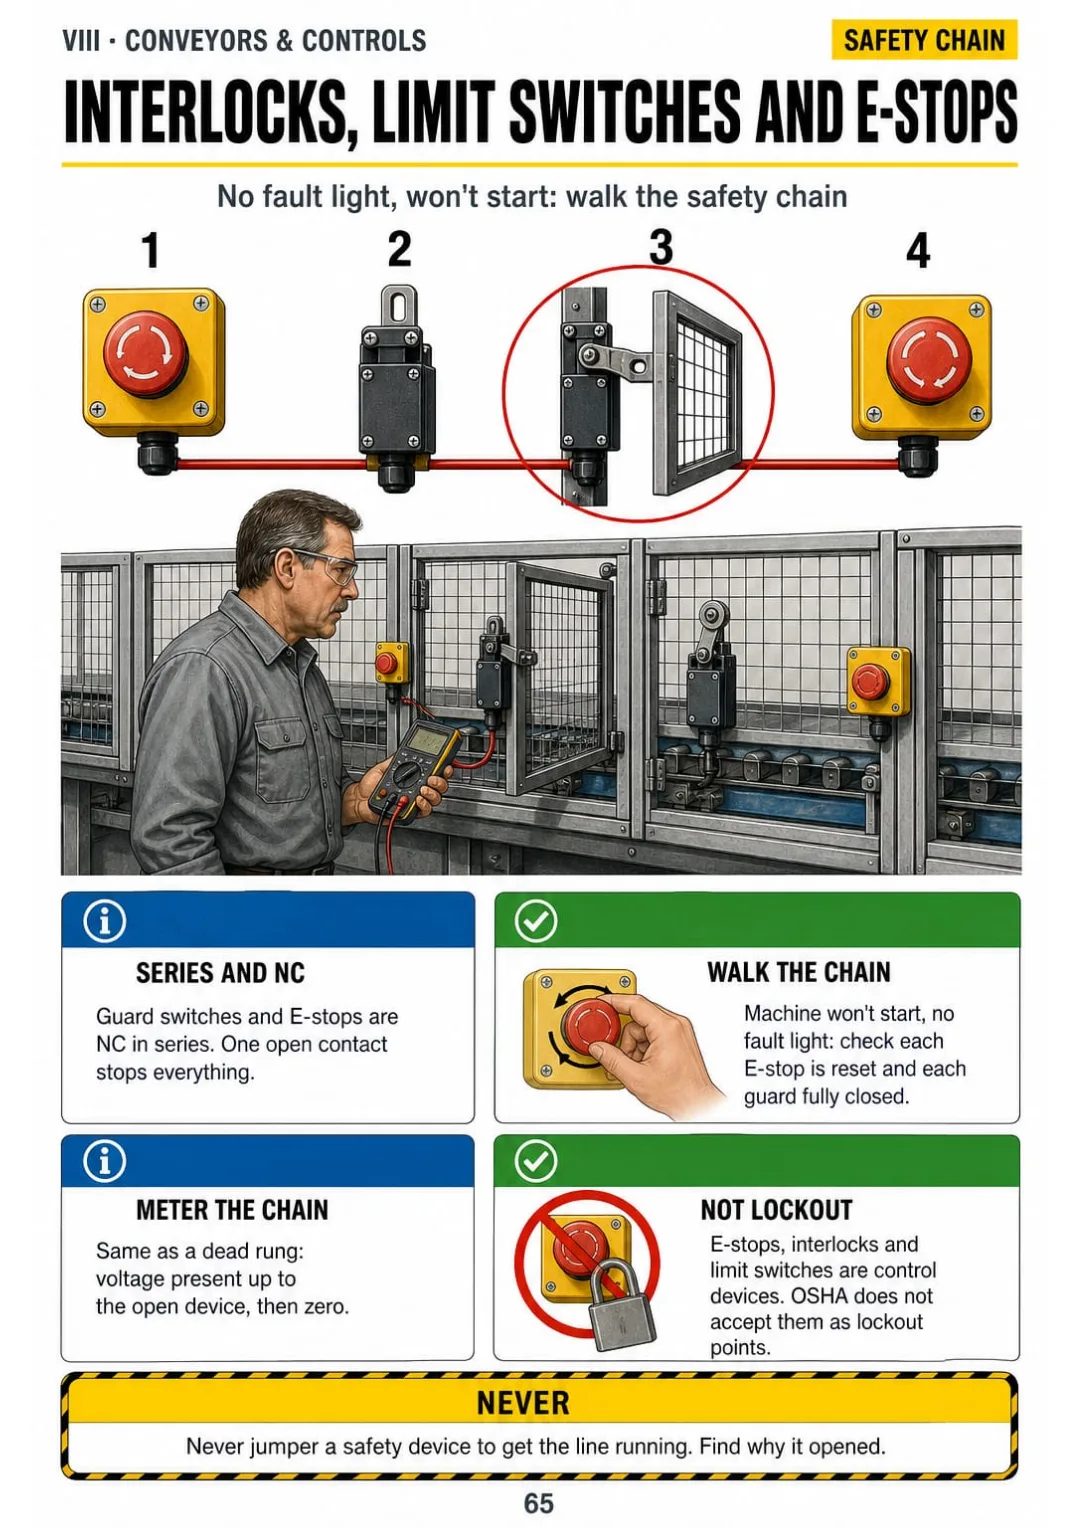
Safety chain: NC devices in series; one open contact stops the whole machine.
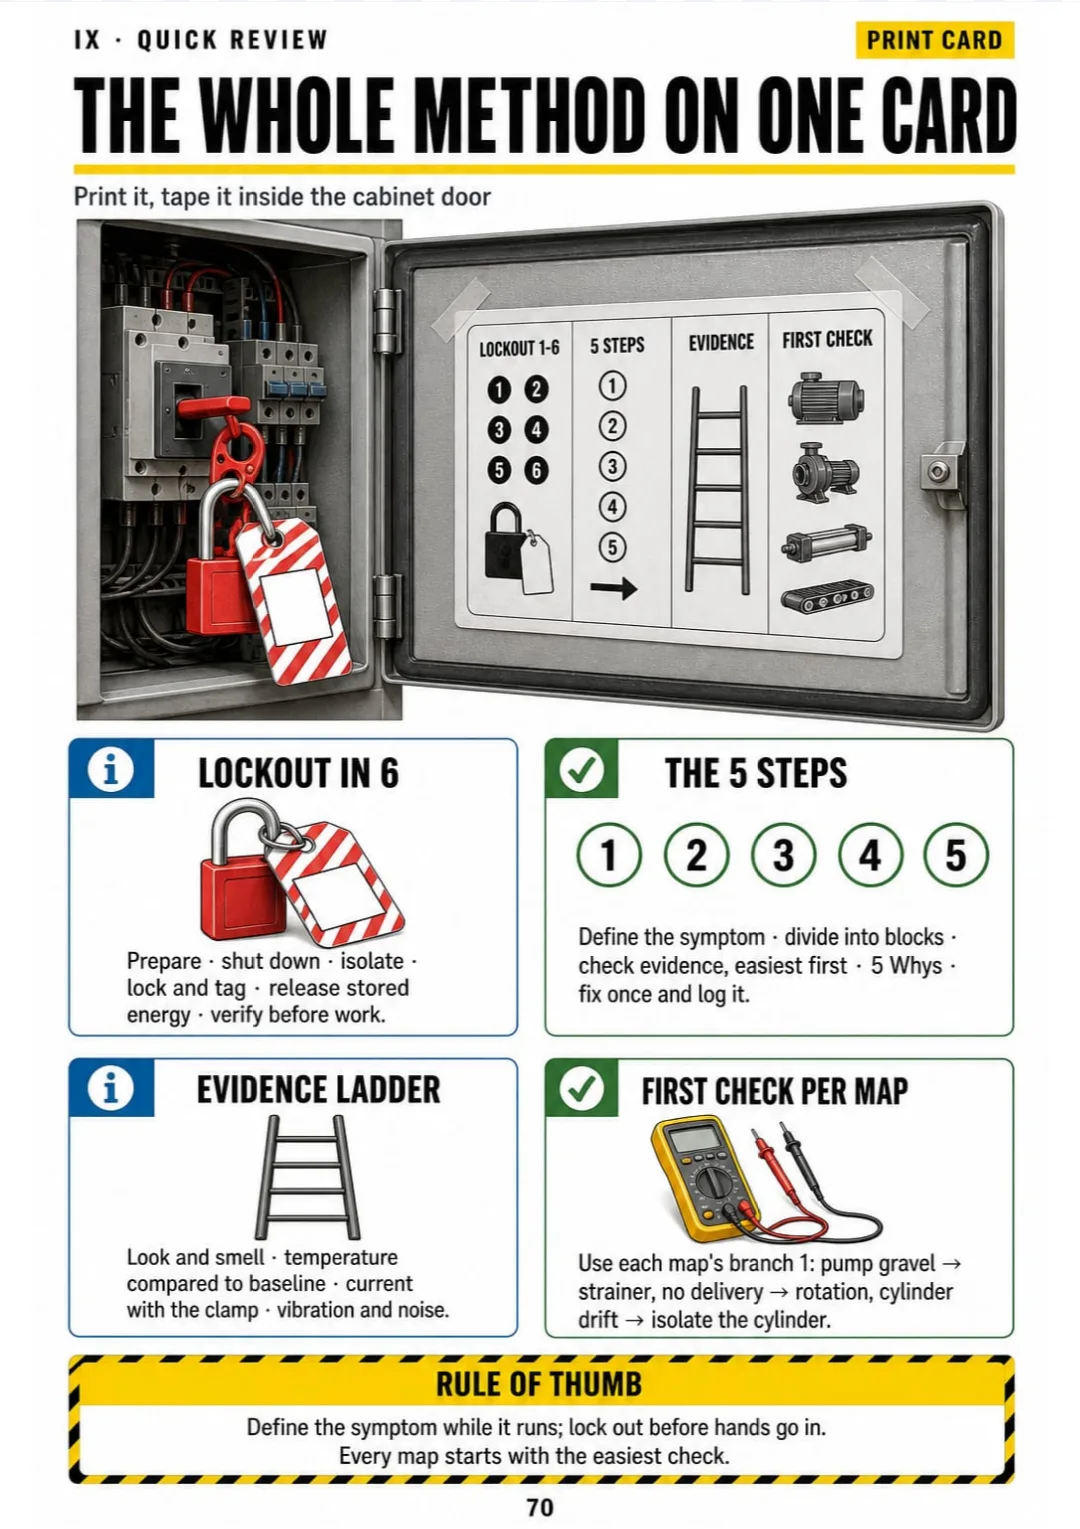
Lockout in 6, the 5 steps, the evidence ladder and each map's first check on one printable card.

Swipe to see more →

These are real pages from the book. The table of contents is the full one: 9 parts and 66 topics.

The Problem Isn't You. It's How It Was Explained to You.

You're standing at a conveyor motor that runs hot and trips every afternoon. The overload relay is new, the amps look close, and the supervisor wants to know when the line restarts.

The manual says to check voltage unbalance. You get three paragraphs and a formula full of averages and deviations. Nobody ever showed you what those numbers look like on your meter.

460, 467, 450 V → about 2% unbalance → keep it at 1% or less

In the book, that's one page. Three readings drawn on the motor leads: 460, 467 and 450 V. One arrow to about 2% unbalance. And a box that says: keep it at 1% or less.

Same with the rest: reading a failed bearing, matching a noise to its cause, the cavitation map, a hydraulic schematic, a dead rung on the ladder diagram. Each one gets its own page.

You take three readings, do the math right there at the disconnect, and you know whether it's the motor or the supply before anyone orders a new one.

COMPARE FOR YOURSELF

Same Topic, Two Ways to Learn It

THIS
  • The manual: line after line after line
  • Machine noises explained only in words
  • You get to the machine still guessing
Acoustic emissions from rotating equipment may originate from multiple mechanical and electrical sources, and their correct attribution requires consideration of frequency content, amplitude, operating conditions and the location of the source relative to the observer. Rolling-element bearing deterioration typically produces a low-frequency growl, whereas belt slippage generally generates a high-pitched squeal under load. Cavitation within centrifugal pumps is commonly described as resembling gravel passing through the casing, while mechanical looseness may result in intermittent knocking. The technician should consider each possibility before proceeding further.
FOR THIS
  • Each sound matched to its cause in one drawing
  • The six sounds in one box
  • You see it and you get it
Growl = bearing, squeal = belt, gravel = cavitation, knock = looseness, hiss = air, hum = powered but stuck.
CONTENTS

Take a Look at the 9 Parts and 66 Topics

Safety first, the 5-step method, reading the evidence, motors, bearings and drives, pumps, hydraulics and pneumatics, conveyors and control circuits, and practice: 70 pages, all illustrated.

IBefore You Touch Anything · pp. 5-10
  1. Why Swapping Parts Doesn't Fix the Machine
  2. Lockout/Tagout in 6 Steps
  3. Stored Energy: The Machine Is Off but Not Dead
  4. Live-Dead-Live: Testing for Absence of Voltage
  5. Troubleshooting Live: When It's Allowed and What You Wear
  6. Your Basic Kit and What Each Tool Tells You
IIThe 5-Step Method · pp. 11-18
  1. The 5 Steps on One Page
  2. Step 1: Define the Symptom in One Sentence
  3. Step 1 Bonus: Ask the Operator the Right Way
  4. Step 2: Divide the System into Blocks
  5. Step 2: Half-Splitting
  6. Step 3: Check the Evidence, Easiest First
  7. Step 4: Confirm the Root Cause with 5 Whys
  8. Step 5: Fix It Once and Write It Down
IIIReading the Evidence · pp. 19-26
  1. Baselines: You Can't Spot 'Abnormal' Without 'Normal'
  2. Temperature: Compare, Don't Guess
  3. Vibration: What 1x and 2x Tell You
  4. Noise: Matching the Sound to the Cause
  5. Pressure Gauges: Where You Put Them Decides What You See
  6. Current: The Clamp Meter Tells the Motor's Story
  7. Look and Smell: The Free Evidence
  8. Intermittent Faults: Catch the Moment
IVElectric Motors · pp. 27-35
  1. Reading the Motor Nameplate
  2. Map: Motor Hums but Won't Start
  3. Map: Motor Trips the Overload
  4. Voltage Unbalance: The Small Number That Burns Motors
  5. Map: Motor Runs Hot
  6. Insulation Testing: The Megger Without Fear
  7. Map: Motor Runs Backward or Speed Is Wrong
  8. VFD Faults Without Panic
  9. Contactors and Overload Relays
VBearings, Couplings and Drives · pp. 36-43
  1. Why Bearings Really Fail
  2. Reading a Failed Bearing
  3. Greasing: More Is Not Better
  4. Map: Bearing Runs Hot
  5. Shaft Alignment Basics
  6. Soft Foot: The Check Before Alignment
  7. V-Belts: Tension and Wear
  8. Map: Gearbox Noisy or Hot
VIPumps · pp. 44-49
  1. A Centrifugal Pump in One Drawing
  2. Map: Pump Sounds Like Gravel
  3. Map: Pump Runs but Doesn't Deliver
  4. Pump Curves Without Math
  5. Map: Mechanical Seal Leaks
  6. Positive Displacement Pumps: Different Rules
VIIHydraulics and Pneumatics · pp. 50-57
  1. Hydraulics: Flow Is Speed, Pressure Is Force
  2. Reading a Hydraulic Schematic
  3. Map: Cylinder Drifts or Won't Hold
  4. Map: Hydraulic System Runs Hot
  5. Contamination: The Silent Cause
  6. Pneumatics: The FRL and Plant Air
  7. Map: Air Cylinder Slow, Weak or Erratic
  8. Solenoid Valves: Electrical or Mechanical?
VIIIConveyors and Simple Control Circuits · pp. 58-65
  1. Conveyor Belt Tracking Rule
  2. Map: Conveyor Belt Slips or Stalls
  3. Chain Drives and Roller Conveyors
  4. Reading a Ladder Diagram
  5. The Start-Stop Circuit with Seal-In
  6. Tracing a Dead Rung with Your Meter
  7. Sensors: PNP, NPN and the LED
  8. Interlocks, Limit Switches and E-Stops
IXPractice and Quick Review · pp. 66-70
  1. Worked Case: Pump Seal Every Three Weeks
  2. Worked Case: Motor Trips Every Afternoon
  3. Most Frequent Troubleshooting Mistakes
  4. Explaining the Failure to Your Supervisor
  5. The 5-Step Method on One Card

One Page, One Topic, All Clear

Think of it this way:

A pump on the line starts to sound like gravel and the flow drops. The operator is looking at you, and everybody already blames the seal.

You open the book to the cavitation map. Strainer, tank level, suction valve, liquid temperature, suction line: drawn in order, with what to look for at each stop.

Cavitation map: strainer → tank level → suction valve → liquid temperature → suction line.

Same with a motor that hums but won't start, a bearing that runs hot, a cylinder that drifts, a belt that slips or a dead rung on the panel: each one on its own page.

Machine Troubleshooting Illustrated is 9 parts and 66 topics, all drawn, with two worked cases, the most frequent mistakes and the whole method on one card at the end.

What you see drawn, you don't have to memorize.

What's Inside Machine Troubleshooting Illustrated:

Ipp. 5-10

Before You Touch Anything

Why swapping parts doesn't fix it, lockout/tagout in 6 steps, stored energy, live-dead-live testing, when live work is allowed and your basic kit.

IIpp. 11-18

The 5-Step Method

The 5-step method, always in the same order: define the symptom and ask the operator, divide the system, half-split to the fault, check the evidence, then 5 Whys so you fix it once.

IIIpp. 19-26

Reading the Evidence

Baselines, temperature, vibration at 1x and 2x, noise, where to put the gauge, the clamp meter, look and smell, and intermittent faults.

IVpp. 27-35

Electric Motors

The nameplate, hums but won't start, trips the overload, voltage unbalance, runs hot, megger testing, wrong rotation, VFD faults, contactors and overloads.

Vpp. 36-43

Bearings, Couplings and Drives

Why bearings really fail, reading a failed bearing, greasing, hot bearings, alignment basics, soft foot, V-belts and noisy gearboxes.

VIpp. 44-49

Pumps

A centrifugal pump in one drawing, the gravel sound, no flow, pump curves without math, leaking seals and positive displacement pumps.

VIIpp. 50-57

Hydraulics and Pneumatics

Flow is speed and pressure is force, reading a schematic, drifting cylinders, hot systems, contamination, the FRL, air cylinders and solenoid valves.

VIIIpp. 58-65

Conveyors and Simple Control Circuits

Belt tracking, slipping belts, chain drives, ladder diagrams, the seal-in circuit, tracing a dead rung, PNP and NPN sensors, interlocks and E-stops.

IXpp. 66-70

Practice and Quick Review

Two worked cases, the most frequent troubleshooting mistakes, explaining the failure to your supervisor and the whole method on one card.

At the end of the book: 2 worked cases, the most frequent troubleshooting mistakes and the whole method on one printable card.


Plus: 2 Free Books

Shop-Floor Case Drills

BONUS 1: «Shop-Floor Case Drills»

Value on its own: US$ 17.90

Real-style breakdown scenarios to work through with the 5-step method, with the answer path drawn on the next page, so the order sticks before the next call.

Symptom Quick Cards

BONUS 2: «Symptom Quick Cards»

Value on its own: US$ 14.90

One printable card per common symptom with the first checks in order, small enough to keep in your toolbox or tape inside the cabinet door.

Machine Troubleshooting Illustrated with 2 Free Books

  • Machine Troubleshooting Illustrated: 70 illustrated pagesUS$ 63
  • BONUS 1: Shop-Floor Case DrillsUS$ 17.90
  • BONUS 2: Symptom Quick CardsUS$ 14.90
  • High-resolution PDF to printIncluded
Total value US$ 95.80
YOUR PRICE:
US$ 27
You save US$ 68.80
YES, I WANT MACHINE TROUBLESHOOTING ILLUSTRATED FOR US$ 27

📄 This is a digital PDF book sent to your email: nothing is printed or shipped.

Secure purchaseEncrypted payment30-day guarantee

PDF by email: We email you Machine Troubleshooting Illustrated as a PDF, together with the two free books. It's a single payment: no installments, no extra charges.

Who This Book Is For

You just moved into maintenance

You just moved into maintenance

You get one sequence to follow on every breakdown, so you know where to start instead of watching someone else and guessing.

You've been fixing machines for years

You've been fixing machines for years

You already know the machines. The book puts your experience in a fixed sequence, one map per symptom, so the same failure stops coming back.

You lead the maintenance crew

You lead the maintenance crew

You hand your new techs the same 5 steps you use, drawn and printable, so everyone on every shift troubleshoots the same way.

Everything You Get Today

US$ 95.80US$ 27
YES, I WANT MACHINE TROUBLESHOOTING ILLUSTRATED FOR US$ 27

📄 This is a digital PDF book sent to your email: nothing is printed or shipped.

30DAYS
GUARANTEE

30-Day Guarantee

Try Machine Troubleshooting Illustrated for 30 days, bonus books included.

We refund everything if the file won't open, if the book isn't what you see here, if you were charged twice or if the email doesn't arrive. Just email us.

You pay once. No subscriptions.

Frequently Asked Questions

Is it for me if I've been in maintenance for years?

Yes. It's not a beginner course: it's one fixed sequence to go from symptom to root cause, with a drawn map per symptom. It doesn't depend on your brand of motor, pump or valve: it shows what to measure and in what order. For brand-specific settings and fault codes, you still use the manufacturer's manual.

Where does the content come from?

Safety steps follow the OSHA lockout/tagout rule (29 CFR 1910.147) and NFPA 70E; motor checks follow NEMA MG 1 criteria. The book explains them in its own words and drawings and doesn't reproduce any standard.

Is it official material?

No. It's an independent illustrated reference. It isn't issued, approved or endorsed by OSHA, NFPA, NEMA or any manufacturer.

Does it replace my training?

No. It doesn't replace your employer's training, your plant's lockout/tagout procedure or the equipment manufacturer's instructions. It helps you put what you know in order.

Do I get a certificate?

No. It's a reference book, not a course: there's no certificate or credential. The case drills are written for this book to practice the 5-step method on shop-floor breakdowns.

When and how do I get it?

As a PDF by email, sent to the address you enter at checkout. The 2 bonus books come the same way.

Do I have to pay every month?

No. It's a one-time payment. No subscription.

Can I get it on paper?

It's a PDF, so you can print the whole book or just the pages you need and keep them in the shop or your toolbox.

How does the refund work?

You have 30 days. We refund everything if the file won't open, if the book isn't what you see on this page, if you were charged twice or if the email doesn't arrive: just email us.

Before You Close This Page

No more swapping parts until it runs.

Cavitation, voltage unbalance, a dead rung: you see it drawn and that's it.

You get to the machine knowing where to start.

Drawings make studying faster.

The book is right below.

One-time payment: US$ 27 · Guarantee: 30 days · PDF by email

YES, I WANT MACHINE TROUBLESHOOTING ILLUSTRATED FOR US$ 27

📄 This is a digital PDF book sent to your email: nothing is printed or shipped.